Intake workspace
The back-of-counter intake surface at /intake — fast creation of repair tickets, bespoke jobs, or stock sales from one screen, with a shared customer picker and live job summary. The structured gemstone fields, the identity-confirmation workflow, and the pickup-counter UI that closes the 'you switched my diamond' scenario aren't built yet — what is and isn't shipped is detailed mid-page.
Quick reference
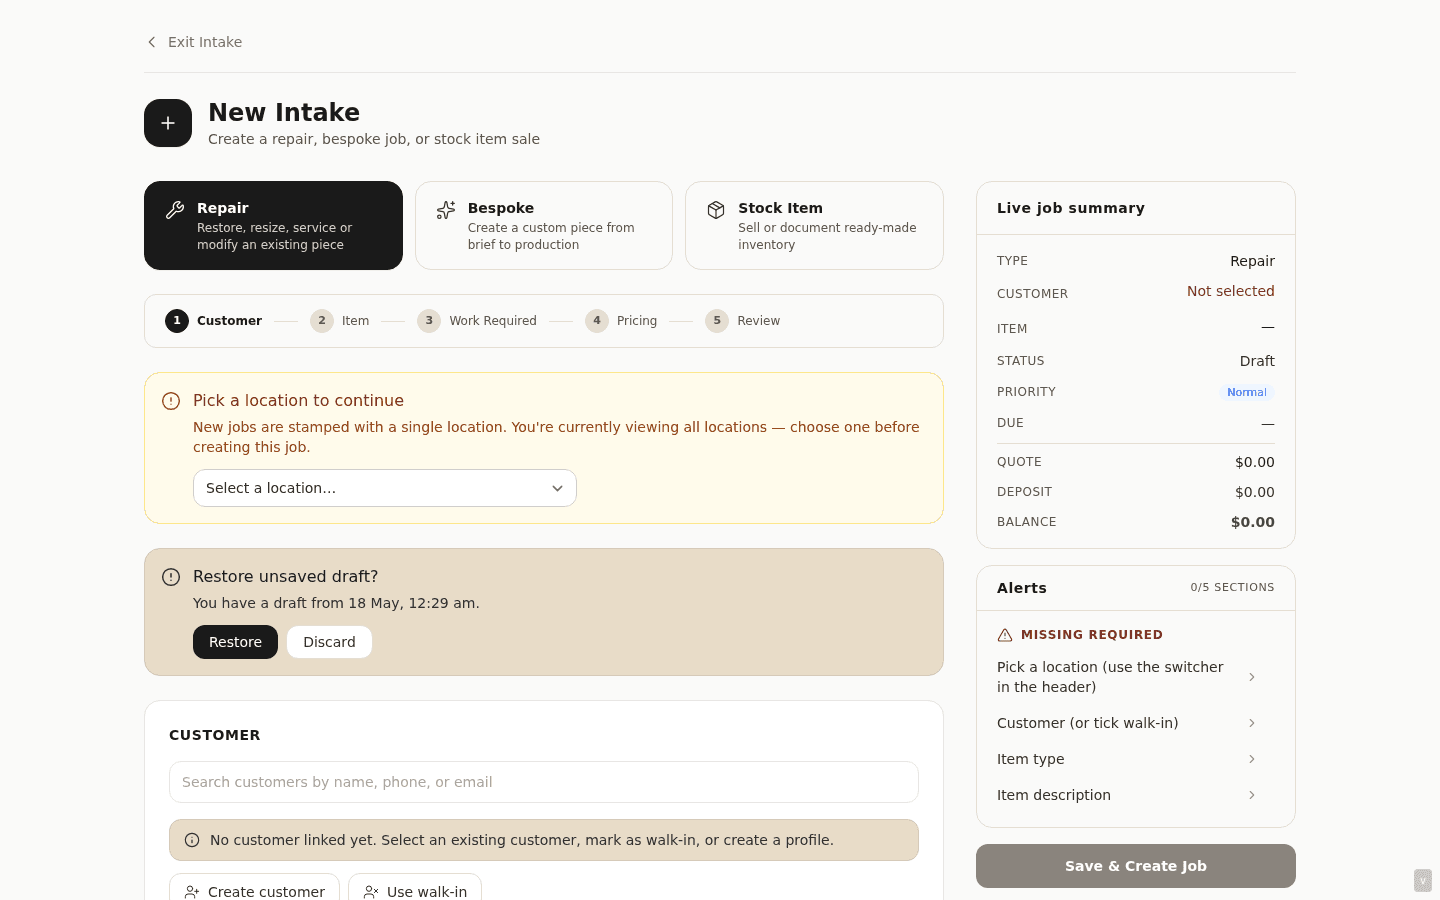
- The intake workspace lives at /intake on a dedicated route (no shared top-nav clutter — it's a focused take-in surface).
- One screen, three job-type branches. A segmented selector at the top switches between Repair, Bespoke, and Stock sale. The customer-section and the live summary panel stay shared across all three.
- The customer picker (top of the form) attaches a customer to the about-to-be-created record; walk-in is allowed for stock sales, less so for repair and bespoke (the customer needs to be reachable when the job is ready).
- The summary panel on the right shows the live job state as you fill the form — type, item, customer, prices, balance owing. Becomes the visual confirmation before you click Save.
- Drafts auto-save to local storage as you type — close the tab by accident and the next open prompts to restore what you had.
The three-branch walkthrough
0. Get to the workspace
Open /intake from the workshop hub, the dashboard's quick-action tile, or by typing it into the address bar. The route is the back-of-counter equivalent of a desk-side phone — staff shift to this tab when a piece is being taken in, regardless of which job type it is.
The page has no top-nav chrome and a single “Exit intake” back-link to the dashboard, deliberately. The focused surface reduces the cognitive overhead of taking a piece in while a customer is standing across the counter.
1. Pick the job type
The segmented selector at the top of the form is the first choice — what is the customer actually here for? Three options:
- Repair — resizing, restringing, re-tipping, stone replacement, polish, anything that takes an existing piece in for work and returns it.
- Bespoke — a custom commission. The customer is describing a piece they want made, not handing over an existing one.
- Stock sale — pulling an item out of inventory for a same-day sale (faster than walking to the POS for high-touch over-the-counter sales where you're already engaged with the customer at the take-in counter).
The selection is preserved in the URL as ?type= so a deep-link to a specific intake type works (a bookmark for “new bespoke quickly” is /intake?type=bespoke).
2. Attach the customer
The customer section sits below the type selector and is shared across all three branches. Search by name, email, or phone in the picker; matching customers surface as a dropdown; click to attach. If the customer isn't on file, the + Create new customer option opens an inline form — full name, email, mobile, phone — and creates the record without leaving the intake page.
For stock sales, the walk-in mode skips the customer attachment for a cash-and-go sale. For repair and bespoke, a customer is required — you can't notify the customer their piece is ready if you don't know who they are.
3a. Repair branch — fill the take-in
Required: item type (Ring, Necklace, etc.), item description, work description. Optional but recommended: due date, deposit amount, intake photos, condition notes, metal type, hallmark, customer-supplied-stone flag, brand, serial number.
Save creates the repair row with stage = intake and lands you on the repair detail page (or, if you're running the workspace as a counter station, the success screen with a print-take-in-slip action).
3b. Bespoke branch — capture the enquiry
Required: title (one-line summary), jewellery type. Optional and important: description (what the customer is describing), budget, design source (their own sketch, a reference image, “something like this but…”), deposit if they're paying one on the spot, due date, metal type, stone type.
Save creates the bespoke job with stage = enquiry; the consultation conversation happens next, see the bespoke pipeline walkthrough.
3c. Stock sale branch — ring it through
Pick an inventory item from the picker (search by name, SKU, scan a barcode). Set the price (defaults to the item's retail price), the payment method, payment received. The summary panel on the right runs the math live — tax, total, balance owing if it's a partial.
Save processes the sale through the same atomic deduction saga as the POS (see POS overview) — stock decrements, the sale row writes, an invoice auto-generates. The stock-sale branch is the same engine as the POS, just on a take-in-friendly form layout.
4. The summary panel
The right-hand rail shows the live job summary as you type: type, customer, item, price, deposit, balance. What you'd read out loud to confirm with the customer before they walk out. The panel also surfaces required-field gaps (“Item type”, “Customer”) and heuristic warnings (“High value — risk acknowledgement required”) so you don't miss anything before save.
Screenshot pending
Intake workspace with form half-filled — Repair tab, customer attached, item description typed, the right-rail summary panel showing the live job preview with two missing-field chips highlighted in oxblood.
5. Auto-save drafts
As you fill the form, the page auto-saves the working state to local storage keyed by job type. Close the tab, come back later, the next visit to /intake prompts to restore your draft. Per-job-type — a repair draft doesn't collide with a bespoke draft. The draft clears on a successful save so a stale draft doesn't overwrite a real submission.
Honest disclosure
The intake workspace itself — the segmented selector, the shared customer section, the summary panel, the three job-type branches sharing one form chassis, the fast creation of repairs / bespoke / stock sales from one screen, the auto-save drafts — is fully shipped and is what your counter staff use today. The structural take-in machinery works.
What isn't shipped yet, named explicitly:
Structured gemstone fields at intake
Intake captures a freeform stones text field and a hallmark field. It does not capture structured gem-cert details — certificate number, grading lab, grade (colour / clarity / cut), exact carat weight, fluorescence, plot diagram reference — as separate, structured columns on the intake form. Stores that need this level of detail today record it in the freeform field; downstream search, reporting, and the appraisal-side reconciliation aren't reading it as structured data.
This is the field set that closes the “you switched my diamond” defence — without a recorded cert number and weight at intake, when a piece comes back and the customer believes it's a different stone, the store has the freeform text but no structured fingerprint to compare against. We're working on the structured-gem intake fields next.
Identity-confirmation workflow at intake
There is no separate step at intake for verifying the customer's identity (ID scan, photo of driver's licence, etc.). The customer picker confirms which existing customer record the job attaches to, but the surface doesn't prompt for or capture a fresh identity confirmation per drop-off. Stores with high-value pieces or repeat fraud risk handle this on a separate paper process today.
Photo-at-intake UI tied to the bench-side view
Photos can attach to a repair or bespoke job at intake today (see Photo attachments on workshop jobs), and they persist with the job for the bench to look at. What isn't built is the explicit intake-photo-surfaces-to-bench-at-assignment framing — the bench tech sees the job photos on the detail page, but there's no dedicated “here are the intake shots you should orient on before you start work” surface. The pieces exist; the workflow is informal.
Pickup-counter side-by-side intake-vs-completion photo UI
The matched-pair scenario — the customer is at the pickup counter, the staff member opens a screen that shows the intake photo and the finished photo side by side so the customer can confirm visually before walking out — is not a built surface today. Both photos exist on the job timeline; they aren't presented in the dedicated pickup-confirmation layout that closes the loop on the “you switched my diamond” defence.
What this means in practice
The intake workspace ships the structural machinery — fast take-in, three job types, shared customer section, photos attaching, drafts auto-saving. It doesn't yet ship the structured-gem fingerprint, the identity-confirmation step, the bench-side intake-photo surface, or the pickup-counter matched-pair UI. Talk to us if any of these are load-bearing for your store — the gap-closing work is the next set of changes on this surface, and we want to hear from stores who'd use them so we build the right thing first.
Common questions
Why is the intake workspace a separate surface from the full /repairs/new form?
Two different counter contexts. The intake workspace is the back-of-counter fast take-in — a customer is standing across from you, you want to capture the essentials and hand back a take-in slip in under a minute, the focused page with no top-nav clutter keeps the staff member's attention on the customer. The full /repairs/new form lives in the regular app chrome and exposes every field — useful for desk-based bench planning, importing a backlog, capturing a repair that came in by post with a written description. Same underlying schema; different counter contexts, different optimisation targets.
Can I take a repair in for an existing repair customer without re-entering their details?
Yes — the customer picker searches existing customers by name, email, or phone. Pick the match and their details attach to the new job. Recent customers surface at the top of the dropdown without searching. The customer record itself stays one row; multiple repairs and bespoke jobs hang off it.
What happens if I close the tab mid-intake?
The page auto-saves your in-progress form to local storage. Next visit to /intake prompts “You have a saved draft from [time], restore?” — accept to pick up where you left off, dismiss to start fresh. Drafts are per-job-type, so a half-filled bespoke draft doesn't collide with a repair you start later. The page also fires a browser “you have unsaved changes” prompt if you try to navigate away with form content, catching the most common close-the-tab-accidentally case.
Does the intake workspace work on a tablet at the counter?
Yes — the layout collapses to a single-column on narrow screens (the summary panel moves below the form), inputs are sized for touch, and the customer-picker dropdown is reachable with a finger. Most stores running a tablet at the take-in counter and a desktop at the bench find this layout works for both. The auto-save protects the tablet's fragile session from interruptions; sleep the tablet mid-intake and the draft persists.
Why does the stock-sale branch exist inside the intake workspace at all — isn't that what the POS is for?
For stores where the take-in counter and the POS are the same desk, having a stock-sale option inside intake saves a context-switch when a customer who came in for a repair also wants to buy something off-the-shelf. The intake workspace's stock-sale branch uses the same underlying sale-creation engine as the POS so the resulting sale, invoice, and stock-decrement are identical — you're just entering through a different door. Stores with dedicated POS terminals separate from the take-in counter typically don't use the stock-sale tab inside intake at all; both options co-exist without one displacing the other.
I have multiple locations — does intake know which location the job is at?
Yes — the active location filter from the top-nav location switcher carries into the intake workspace. If you're viewing “All locations” and try to save a new job, the intake page prompts you to pick a specific location first (jobs need a single home location). The location-gate banner makes the requirement explicit rather than failing silently at save time.
Troubleshooting
Save button is disabled and I can't tell why
Symptom: the save button at the bottom of the form is greyed out with no obvious reason. Cause:the missing-field chips on the summary panel name the specific gap — usually a required field that hasn't been filled in. The page also blocks save on negative-value prices, deposits exceeding the quote, or an out-of-stock item selected for a stock sale. Fix:check the summary panel's missing-fields chips at the top; click any chip to scroll to and focus the relevant field. Once the form is valid, the save button enables.
“Pick a location to continue” banner appears when I try to save
Symptom: you're ready to save the intake but a yellow location-gate banner blocks the save. Cause:the tenant has multiple locations and the top-nav location switcher is on “All locations”. Jobs need a single home location stamped on them so the location-scoped views (which location's repairs, which location's bespoke) stay honest. Fix: pick a location from the dropdown inside the banner. The gate clears, the save button re-enables. The location stays selected for subsequent jobs until you flip the top-nav switcher away.
Draft restore prompt is offering yesterday's draft
Symptom:you open intake fresh and see a “Restore draft?” banner referring to a draft from a day or more ago that you don't want anymore. Cause: a previous intake session was closed without saving and the draft persisted in local storage. Fix: clickDismiss on the banner — the draft clears from local storage and won't prompt again. If the draft has work in it that you do want, restore and continue; otherwise dismiss is the clean clear.
Created the wrong job type by mistake
Symptom:meant to create a bespoke job, hit Save on the repair tab, now there's a repair record where a bespoke should be. Cause: the segmented selector at the top of the form is easy to miss when staff are focused on the customer conversation; the form looks similar across the repair and bespoke branches. Fix: open the wrong-type record, advance its stage to cancelled with a note explaining the re-key, then create the right-type record fresh. Cancelling rather than deleting keeps the audit trail honest about what happened — the team's next eyes-on can see the cancellation reason and learn from the pattern.
Related
- Workshop overview — where the resulting jobs land in the hub
- Repair pipeline — what happens to a repair after intake
- Bespoke pipeline — what happens to a bespoke job after intake
- Photo attachments — how intake photos attach and surface
- Processing a sale — the POS-side equivalent for stock sales
- Repair tracking — what your customer sees on /track after you create a ticket here