Locations and multi-store
Add and manage every site you operate — showrooms, workshops, warehouses, offices — with per-location address and contact details, per-day operating hours, archive / restore controls, and the team-member-access scoping that restricts which staff can see and act on each site. Plan-tier limits cap the number of active locations.
Quick reference
- Locations live at /settings/locations (list / add) and /settings/locations/[id] (per-location detail with operating hours and assigned team members).
- Five location types in the type dropdown: showroom, workshop, warehouse, office, other. The type is a label only — it doesn't gate any feature, only helps with sorting and reporting.
- Plan-tier limits cap active locations. Boutique = 1 location. Studio = 3. Atelier = unlimited. Hitting the limit disables the Add location button and surfaces a “Need more locations?” card linking to /billing. Archived locations don't count against the limit.
- Three lifecycle states for a location: Active (in normal use, counts against plan limit), Archived (kept for historical reference, doesn't count against limit, can be restored), and Deleted (only allowed when no sales / repairs / jobs / inventory ever referenced it — irreversible).
- Per-day operating hours (Monday-Sunday) on each location's detail page. Each day gets an open-close time pair plus a Closed checkbox. The hours surface on the customer-facing storefront page for that location and inform appointment-booking availability.
- Team-member-to-location scoping is enforced by team_members.allowed_location_ids. null means access to every location; a populated array restricts the member to only those IDs. Configured from the team-and-roles surface, surfaced on the location detail page in the “Assigned members” section.
Walkthrough
1. Open the locations list
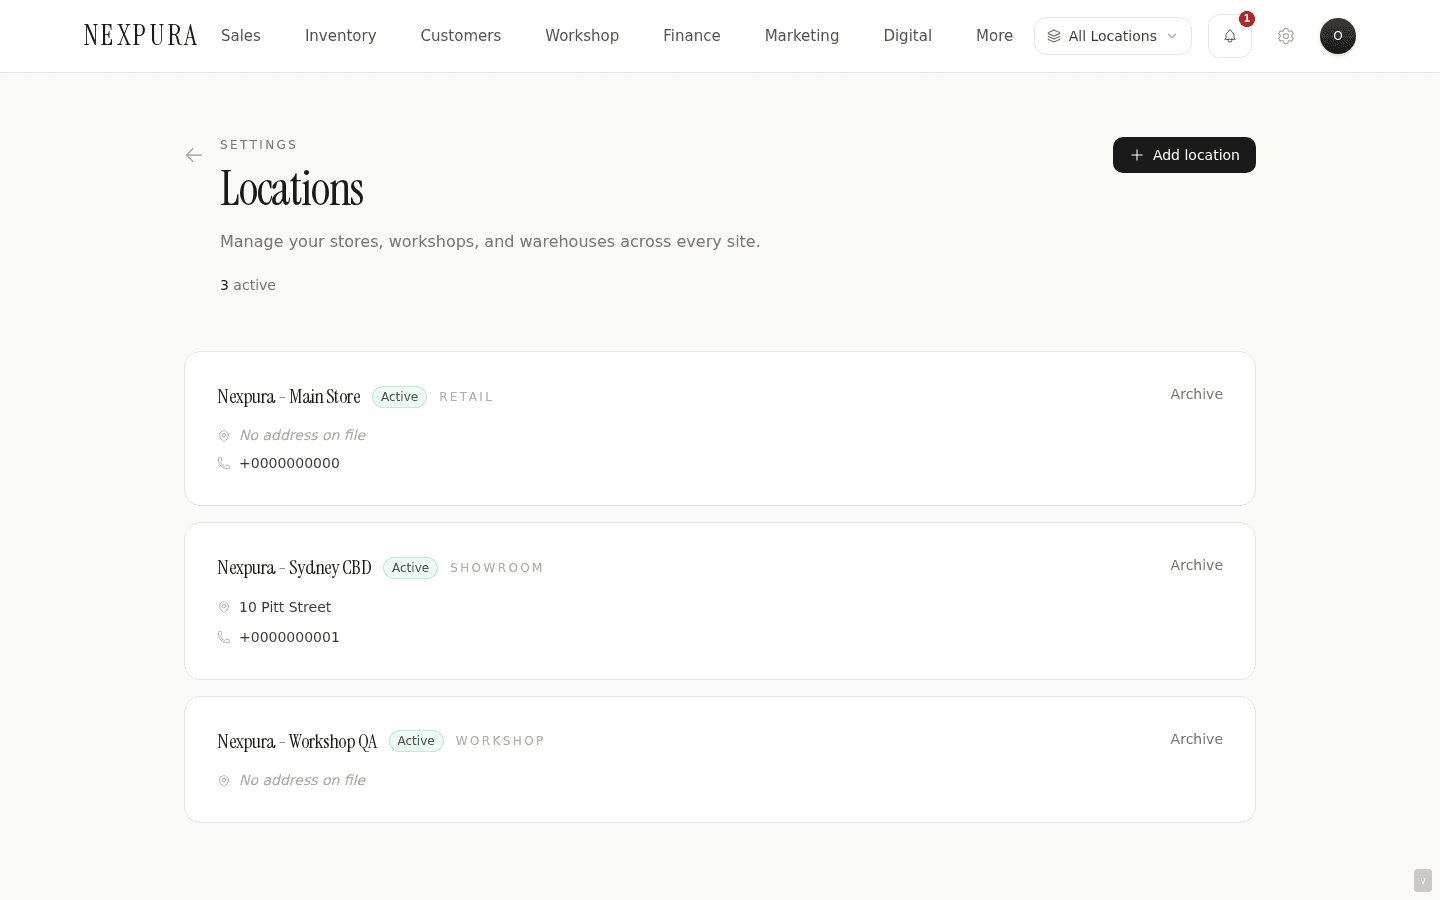
Go to /settings/locations. The page renders the page header (“Locations” with subtitle “Manage your stores, workshops, and warehouses across every site.”), an Add location button top-right, a count strip showing active / archived numbers and the plan limit, and the list of existing locations as stacked cards.
Each card carries the location name, the Active / Archived badge, the type label (showroom / workshop / warehouse / office / other), the full address line, and the phone and email if present. The right edge of the card has the Archive (or Restore for archived rows) action and — for archived locations only — a Delete action.
2. Add a new location
Click Add location. The button flips to Cancel and a form panel slides into view above the list. Required field: Store name. Optional: type (defaults to showroom), street address, suburb / state / postcode / country, phone, email. Save location commits the row; the new location appears at the bottom of the list.
If you're at the plan limit, the Add location button is disabled and a “Need more locations?” card sits above the list with a View plans link. The card explicitly names your current plan (“You've reached the Boutique limit of 1 location”) so the upgrade path is obvious.
Archived locations don't count against the limit. If you have one Boutique slot used by an active store and one archived location, you can't add a new active one without either archiving the existing active one OR upgrading. Restore-then-archive of an old one isn't a workaround — the restored row briefly consumes the slot.
3. Open a location to edit details and operating hours
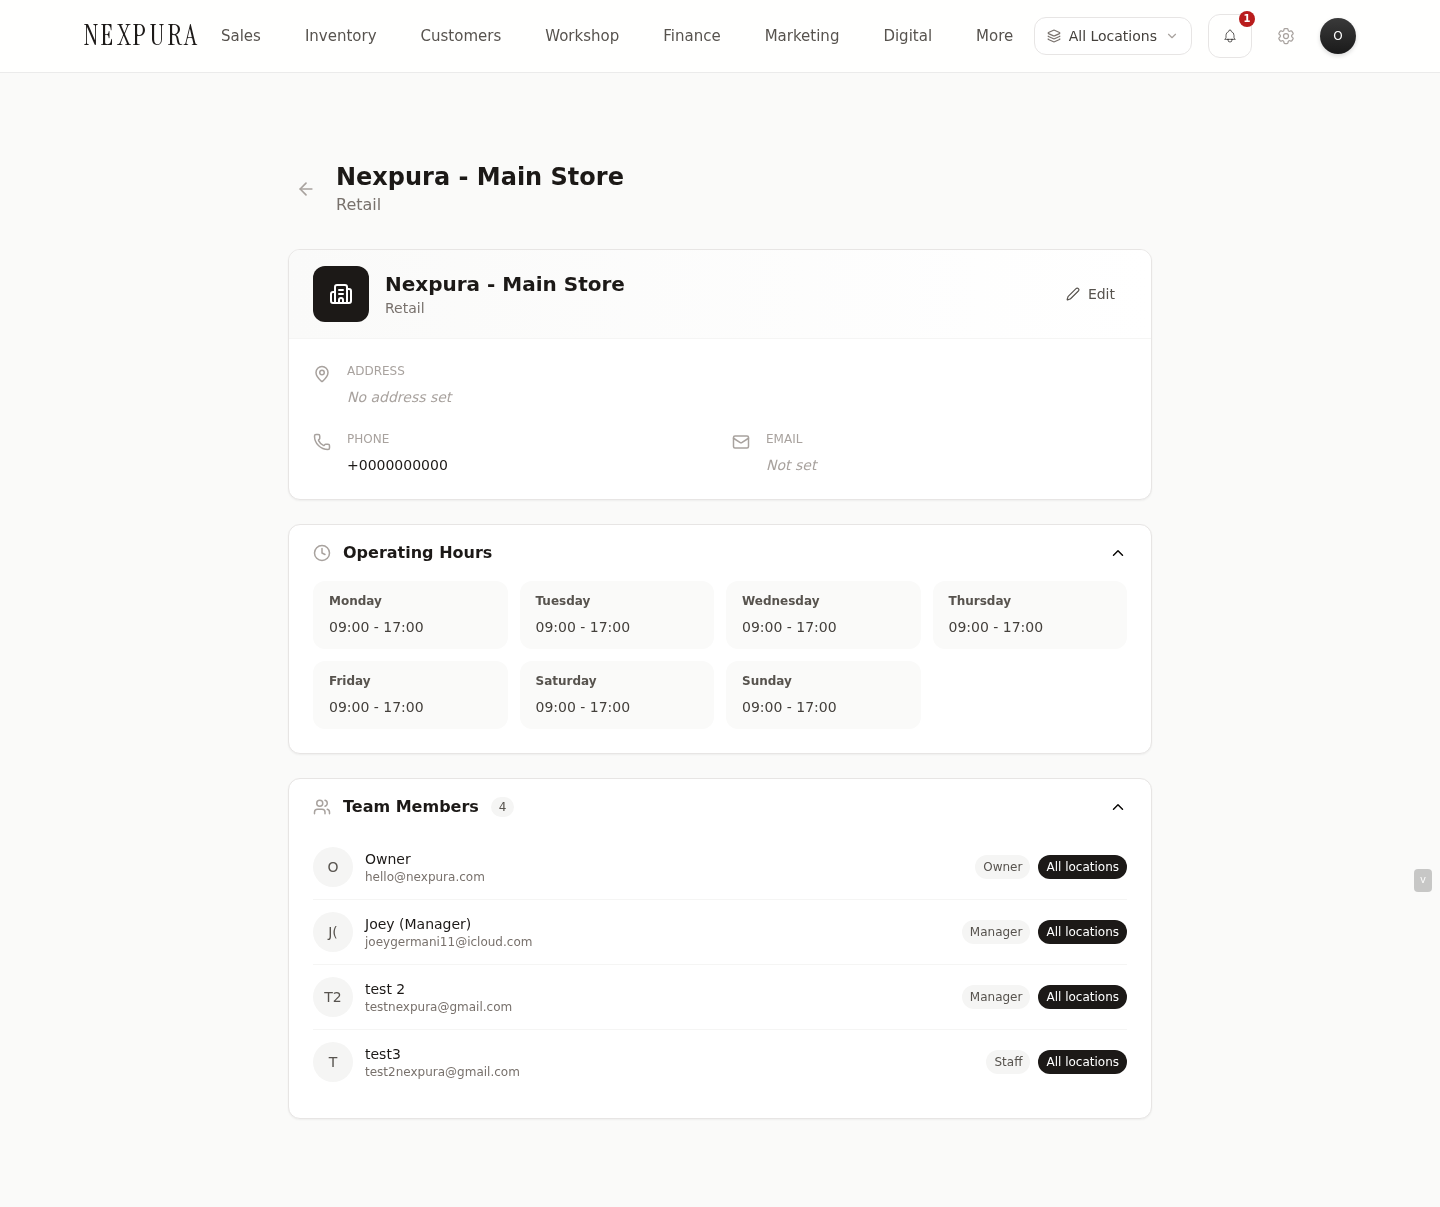
Click into any location card from the list to open its detail page at /settings/locations/[id]. The detail page shows the location name and type as the header, an editable contact / address card, and two collapsible sub-sections: Operating Hours and Assigned Team Members.
Click Edit on the contact card to flip the address + phone + email fields into editable inputs. Save commits the changes. The Operating Hours section renders the seven days of the week, each with an open time, a close time, and a Closed checkbox. Defaults are 09:00-17:00 weekdays, closed Sunday — adjust to match your real hours. The customer-facing storefront for that location reads these hours; appointment booking availability respects the closed flag.
4. Restrict a team member to specific locations
Team-member-to-location scoping is configured from the team surface rather than the location surface — open /settings/team (or the roles surface at /settings/roles), find the member, click the Locations affordance, and tick the locations they should have access to. Leaving all unticked, or selecting “All locations”, stores null in team_members.allowed_location_ids — interpreted system-wide as access to every location, including any future locations added later.
Once scoped, the member sees only the allowed locations in dropdowns when creating sales, repairs, bespoke jobs, and inventory transfers. The location-switcher in the top navigation only shows their allowed sites. Sales and inventory rows tied to disallowed locations don't appear in their lists.
Owner role always has access to every location — the scoping field is ignored for owners. Manager defaults to all-access too, but can be scoped down explicitly if you have managers running specific sites. Staff and technician are commonly scoped to one or two locations.
Screenshot pending
Team page location-access modal — opened from the Locations action on a team member row. Modal title 'Manage location access for Jane Smith'. List of every active location with a checkbox: Main Showroom (checked), Workshop Bay (checked), Warehouse (unchecked). Save button at the bottom.
5. Switch active location during a session
When a member has access to more than one location, the top navigation surfaces a location switcher (the per-session active location for stock counts, sale location stamping, and inventory transfers). Sales and repairs created during the session are stamped with the active location.
Members scoped to a single location skip the switcher — their one location is always active. The switcher only renders when the allowed-location count is greater than one (or when the member has all-access).
6. Archive or delete a location
Archive is the soft-retire path. Click Archive on a location card to flip the row to archived state — it stays in the list (in a slightly dimmed style with the Archived badge), stops counting against the plan limit, and is hidden from operational dropdowns. Historical rows tied to it (old sales, old repairs) still display the location name correctly. Restore puts it back.
Delete is irreversible and only allowed when the location has never been referenced by any sale, repair, bespoke job, or inventory row. The confirm dialog spells this out (“This action cannot be undone... You can only delete locations that have no linked sales, repairs, jobs, or inventory”). Most real-store locations should be archived rather than deleted — deletion is for typo / test rows you want to clean before going into production.
Common questions
Why archive instead of delete? Why can't I just remove a location I'm not using anymore?
Historical accounting integrity. If you have sales from three years ago that occurred at a location you've since closed, deleting the location would orphan those rows — the sales would still show the now-deleted location ID with no name attached, and reports broken down by location would start showing blank rows for the historical period. Archive preserves the name and address so old invoices and reports still read correctly while removing the location from operational use.
Delete is allowed when the location has no dependencies — typically a typo row from setup, or a test location added during onboarding that never had a sale recorded against it. The system enforces this; you can't accidentally delete a location with linked history.
How does the plan-tier limit interact with archived locations?
The limit counts active locations only. Boutique caps at 1 active; Studio at 3 active; Atelier unlimited. Archived locations don't consume the budget — you can have any number of archived rows regardless of plan. Practical effect: closing a store and opening a replacement at a Boutique plan works fine — archive the old, add the new, no plan upgrade needed. Opening a second simultaneous store on Boutique requires upgrading first.
The “Need more locations?” card on the locations list links directly to /billing if you want to lift the cap.
How does location scoping interact with the permission matrix?
Two layers, both enforced. The permission matrix determines what kinds of action a member can take (e.g. can they create sales, can they manage repairs, can they view financials). The location scoping determines WHICH location's data those actions touch. A staff member with canCreateSales true and scoped to Main Showroom can create sales at Main Showroom but can't see the Warehouse's sales list at all.
Owners bypass both — they always have every permission AND every location. Manager defaults to every permission too but can be scoped to specific locations if you have site-level managers. Staff / technician roles are commonly scoped narrowly. The team-and-roles page documents the role + permission shape; this page documents the location dimension that overlays it.
What does the location type field actually do?
It's a label for sorting and reporting — the type field doesn't gate any feature today. A workshop location and a showroom location behave identically in the system; the type just helps you and your team distinguish them in lists and dashboards.
Future surfaces may consume the type (e.g. routing new repairs to locations of type workshop by default, or restricting POS to type showroom). The field is in place so the data is collected today, even though the routing-by-type behaviour isn't shipped yet.
I scoped my staff member to one location, but they're still seeing inventory from another location. Why?
Two common causes. First, the scoping field stores an array of location IDs — if it's set tonull (rather than an explicit array), the member is all-access. Open /settings/team, find the member, open the location modal, and explicitly tick the locations they SHOULD have access to and untick the rest. Save.
Second, inventory visibility depends on both location scoping AND the active location in the session. A member with access to Main Showroom + Workshop Bay sees the union of both when their active location is set to one of them — they can switch between but can't see Warehouse stock. Members scoped to a single location skip the switcher entirely.
Can I have a location with no physical address — for example, an online-only sales bucket?
Yes. Address fields on Add location are optional — only the Store name is required. A location with no address still functions normally for stamping sales, scoping inventory, and counting against the plan limit. The address area on invoices that use this location will print blank in that section. Common pattern: name it “Online” or “Shopify channel” with no address, set its type to “other”, and treat it as a bucket for non-physical-store revenue.
Troubleshooting
Add location button is greyed out and I can't click it
Symptom: the Add location button at the top-right of the locations page is disabled. Cause: you're at your plan's active-location cap. Boutique = 1 active. Studio = 3. Atelier = unlimited. The “Need more locations?” card above the list confirms the cap and names your current plan. Fix: two paths — archive an existing active location (it stays available historically but stops counting), or upgrade your plan at /billing. The upgrade option is the right one if you genuinely need both sites operationally; the archive option is right if you're replacing a closed store.
Cannot delete a location — error says it has linked sales / repairs / jobs / inventory
Symptom:the Delete button (only visible on archived rows) returns “Location has linked records” or the delete is refused. Cause: the location has at least one referenced sale, repair, bespoke job, or inventory row in your history. Deletion would orphan those references and break historical reports. Fix:in almost every real case the right answer is leave it archived — archived rows preserve the name for historical display, don't consume plan slots, and stay out of operational dropdowns. Delete is reserved for never-used typo / test rows. If you genuinely need to remove a location with history, contact support — the migration path requires moving the historical rows to a placeholder location, which is a manual operation.
Staff member can't see the location switcher in the top navigation
Symptom:a staff member reports they don't see a way to switch between locations. Cause:the switcher only renders when the member has access to more than one location. If they're scoped to a single location, their one location is always active and the switcher is hidden by design. Fix: if they should have access to multiple locations, open /settings/team, find the member, open the location-access modal, tick the locations they should access, save. They need to refresh their session for the switcher to appear.
Operating hours saved on a location, but the customer storefront still shows different hours
Symptom: you updated operating hours on the location detail page, saved, but the customer-facing storefront for that site still displays the old hours. Cause: storefront pages are statically rendered with a short revalidation window for performance — the new hours haven't propagated to the customer view yet. Fix:wait a few minutes for the storefront cache to refresh automatically. If the change still doesn't appear after 10 minutes, hard-refresh the storefront page (Cmd+Shift+R or Ctrl+Shift+R) which forces a fresh fetch. The storefront docs page covers the static-rendering posture in more detail.
Location list shows a count that doesn't match what I see on the page
Symptom:the count strip shows e.g. “2 active · 1 archived · 2 of 3” but you only count one card. Cause: the list shows BOTH active and archived locations by default; the count strip is summing both buckets. The plan-limit count (2 of 3) reflects active only. Fix: no fix needed — this is the intended display. The archived cards have a slightly dimmed style and an Archived badge to distinguish them. If you want to hide archived rows from view, no filter exists today; the operational dropdowns elsewhere in Nexpura DO hide archived locations automatically.
Related
- Business profile — tenant-wide identity, including the master business address that locations supplement
- Team members and roles — where per-member location-access scoping is configured
- Billing and subscription — plan tiers and the limits that cap your active locations
- First location — the onboarding-time first-location flow that pre-populates this surface
- Multi-location transfers — moving stock between sites