Importing your existing data
Bring inventory, customers, repairs, and history across from another system using CSV templates or the assisted Migration Hub.
Quick reference
- Two paths: CSV self-serve at
/settings/import, or the assisted Migration Hub at/migration. - CSV self-serve covers inventory, customers, repairs, bespoke jobs, sales, and suppliers — each with a downloadable template.
- Migration Hub supports specific source vendors (Swim, Jewel360, WJewel, Shopify, Lightspeed, Square, WooCommerce, Vend, Edge POS, QuickBooks) plus generic CSV / Excel and custom-site paths.
- CSV upload is one-shot; Migration Hub is a multi-step session (files → mapping → preview → execute) you can pause and resume.
- File formats: CSV and Excel (.xlsx). Image import for inventory is not supported today.
Walkthrough
1. Decide which path fits
The two paths handle different sizes of move:
- CSV self-serve (
/settings/import) is faster for one or two entity types — say, importing 800 customers and a 1,200-row inventory, but no order history. You download a template per entity, fill it, upload it, and the import runs inline. - Migration Hub (
/migration) is built for full-system moves where you're bringing across customers and inventory and repair history together, often from a specific source POS (Swim, Jewel360, WJewel, Edge POS, etc.). It runs as a structured session with field-mapping and a preview step before anything writes.
Roughly: under a thousand rows of one or two entity types, take the CSV path. Bigger than that, especially with history, take the Migration Hub.
2. CSV self-serve — download a template
Open /settings/import. Six entity tabs across the top: Inventory, Customers, Repairs, Bespoke Jobs, Sales, Suppliers. Click the tab for what you're importing, then click Download template. The CSV downloads with the exact header row and two example rows.

3. Fill the template and upload
Edit the template in Excel, Google Sheets, or any spreadsheet tool. Keep the header row unchanged. Save as CSV. Back on /settings/import, click Upload and pick your file.
Nexpura parses the headers, validates the rows against the schema for that entity, and either runs the import or shows you the rows that failed validation. A successful import shows a row count and a link to the entity's list view so you can verify it landed.
Screenshot pending
A successful inventory CSV upload showing the row-count summary and the link to view the imported records.
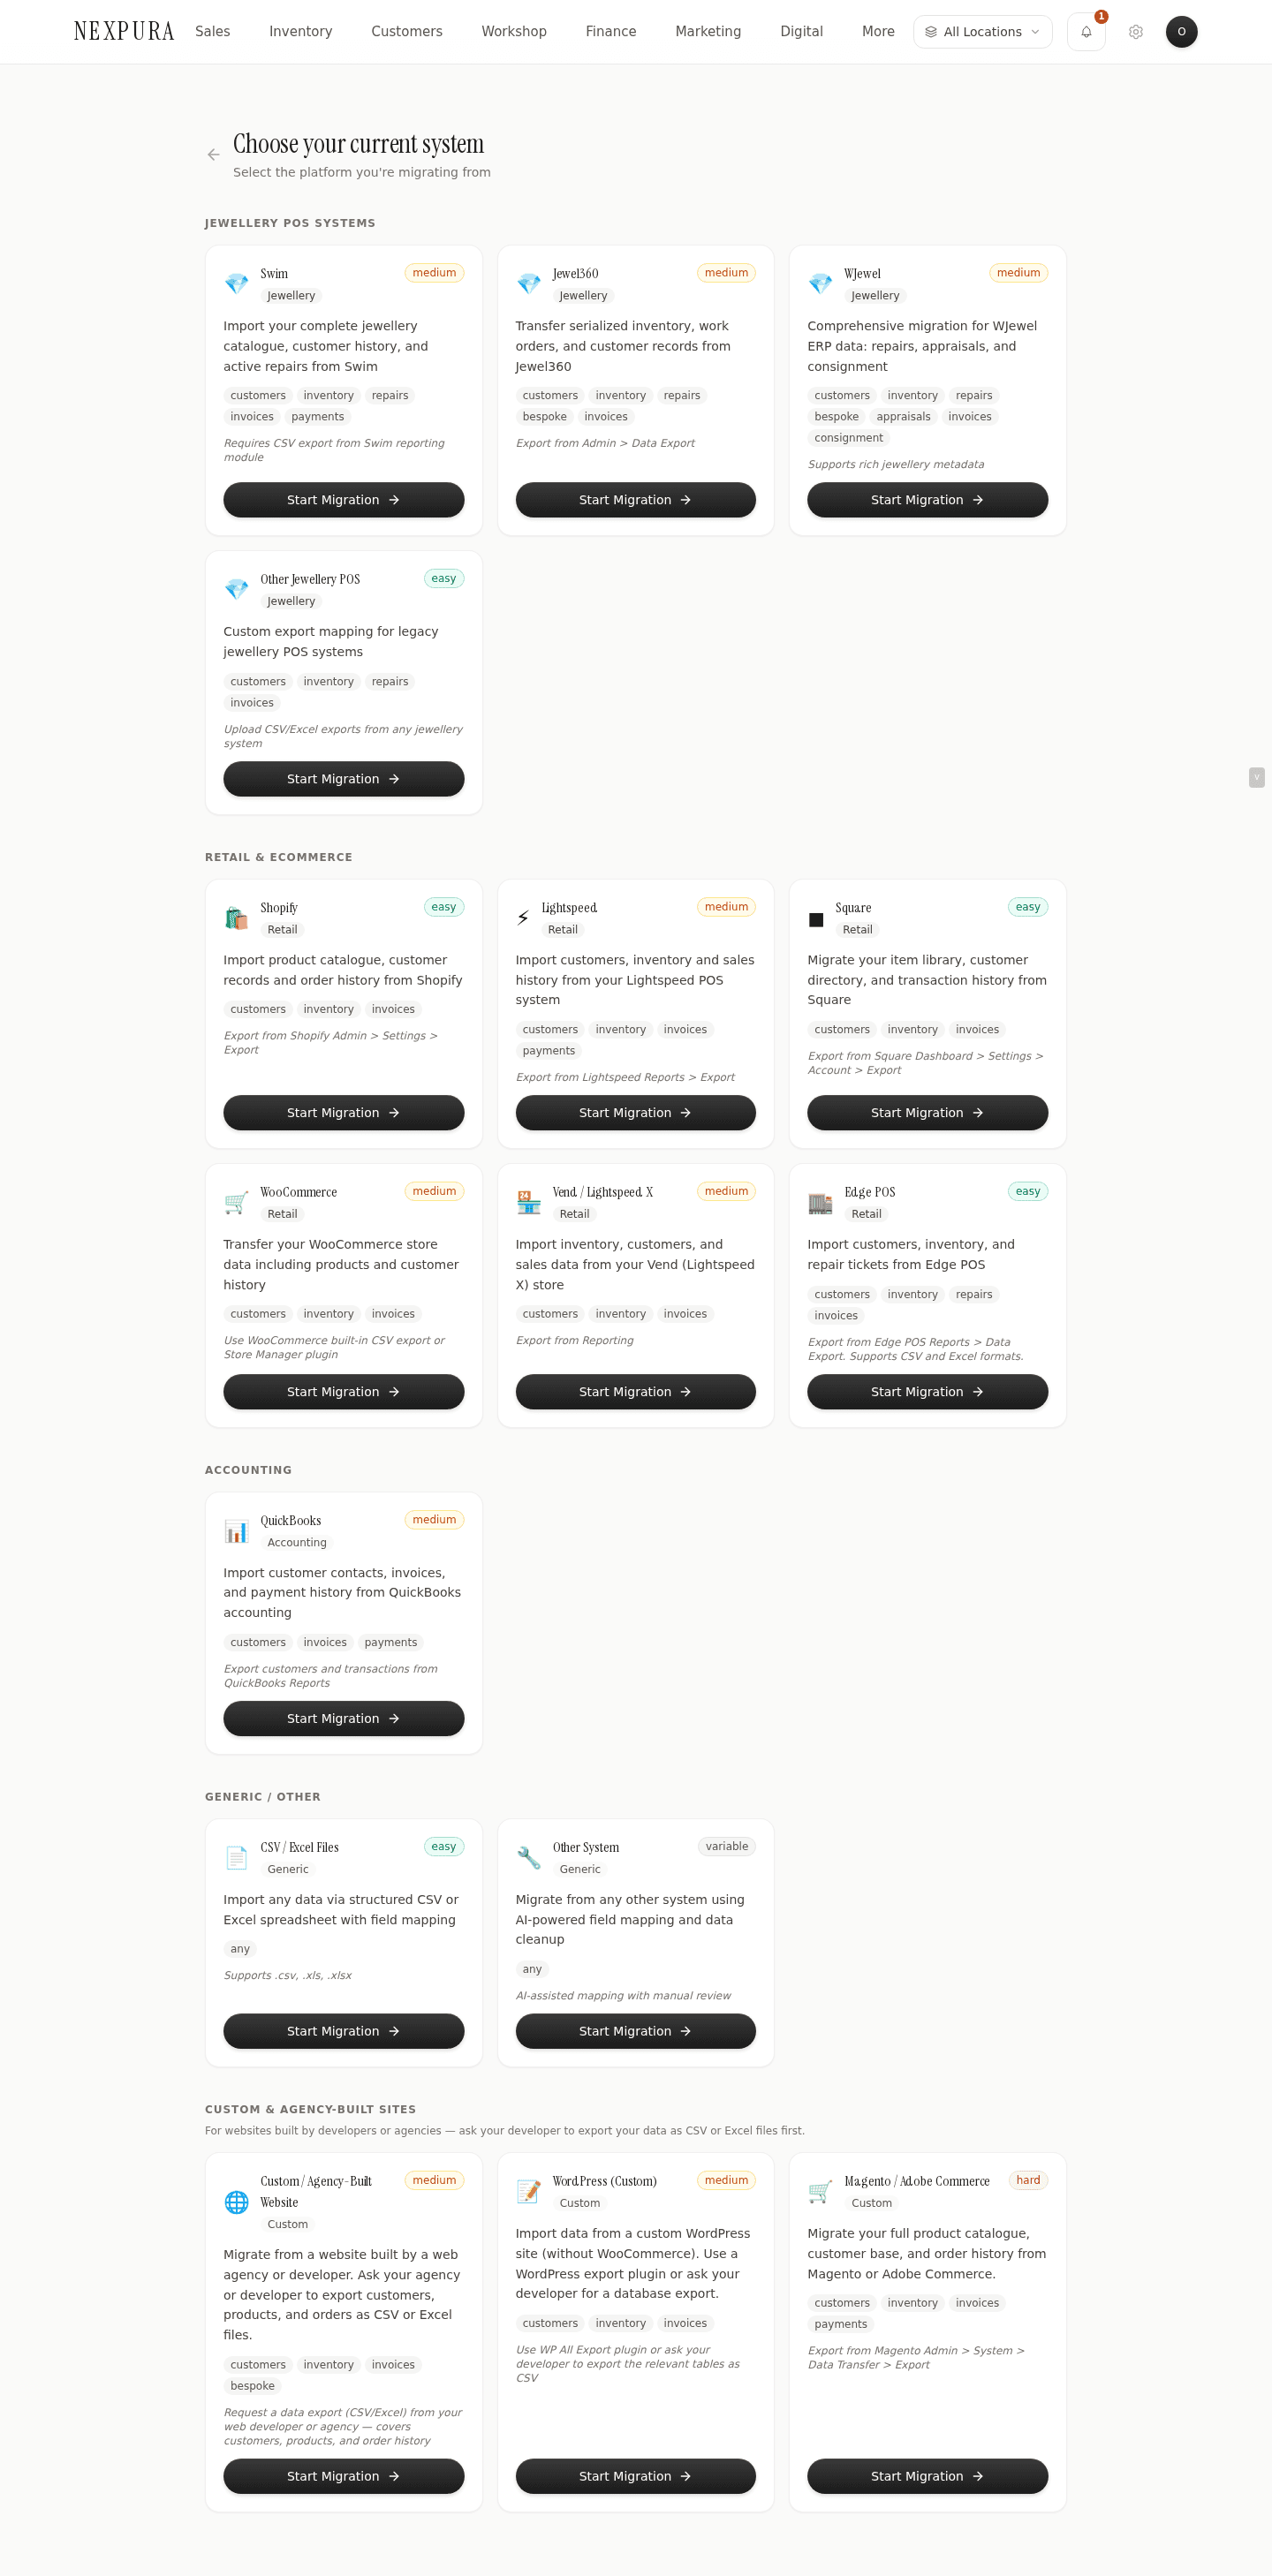
4. Migration Hub — pick your source
Open /migration. Click Start New Migration, which takes you to /migration/new. The page lists supported sources in four groups: Jewellery POS (Swim, Jewel360, WJewel, Other Jewellery POS), Retail & eCommerce (Shopify, Lightspeed, Square, WooCommerce, Vend, Edge POS), Accounting (QuickBooks), and Generic / Custom (CSV / Excel, Other System, Custom Website, WordPress, Magento).
Each card shows the entities that source can supply (customers, inventory, repairs, invoices, etc.) and a note on how to export from that platform. Pick the one you're migrating from; the session opens.
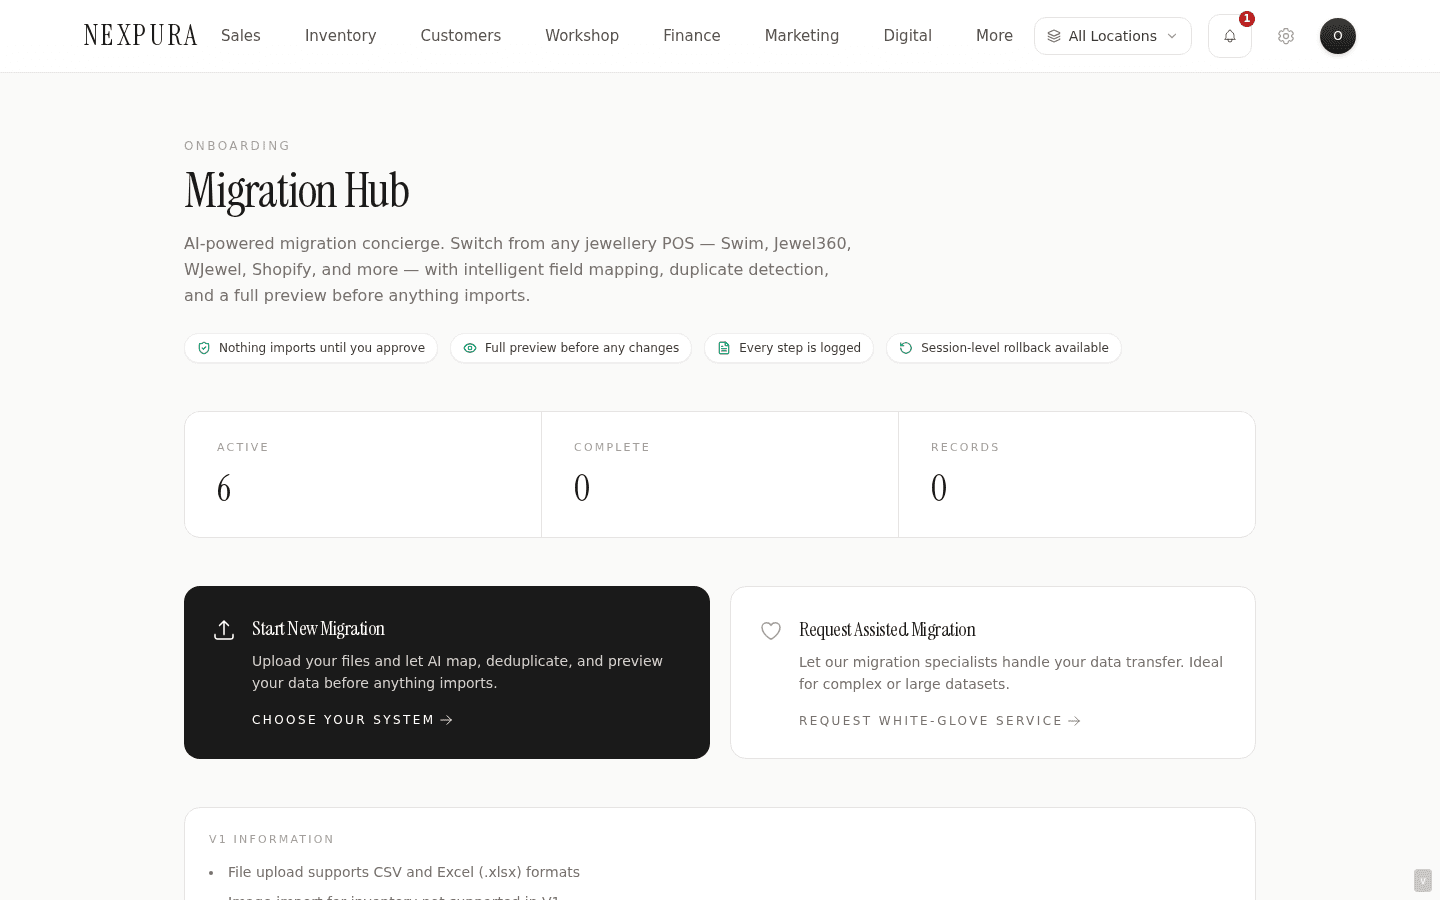
5. Migration Hub — upload, map, preview, execute
The session walks four steps:
- Files — upload one or more CSV / Excel files from your source system.
- Mapping — Nexpura suggests how source columns map to its own fields; you confirm or correct.
- Preview — the system shows what will write, including duplicate detection results, before anything commits.
- Execute — run the import. Progress updates poll every five seconds; the session moves to Complete when done.
The session is resumable. Close the tab, open /migration later, and the row is still there in your Recent migrations list with the current step indicated. Click in to pick up where you left off.
Screenshot pending
Migration Hub session at the Preview step showing the row-count breakdown by entity and the duplicate-detection summary.
6. Request assisted migration if it's complex
For large or messy datasets, /migration also offers Request Assisted Migration as a second CTA on the hub. That hands the job to our migration team — you upload your source files and we handle the mapping and execution end-to-end. Recommended when the source data has known integrity issues (duplicated customers, partial repair history, inconsistent stock IDs) or when the source vendor isn't in the supported list.
7. Verify after import
Whichever path you used, open the entity list views (Inventory, Customers, etc.) and spot-check the row counts and a handful of records. For history-bearing entities (repairs, invoices), confirm dates carried across correctly — date format mismatches are the most common silent issue.
Common questions
Which path should I pick?
One or two entity types, no order history: CSV self-serve on /settings/import. Full-system migration with order history, especially from a known source vendor: Migration Hub. If the source isn't in our list or the dataset is messy: book the assisted migration. There's no penalty for experimenting — both paths land in the same database and you can rerun.
What systems can I migrate from?
CSV templates on /settings/import are vendor-agnostic — any system that can export CSV will work as long as you map the columns to our template. Migration Hub explicitly supports Swim, Jewel360, WJewel, Edge POS, and a generic “Other Jewellery POS” option in the jewellery category; Shopify, Lightspeed, Square, WooCommerce, and Vend for retail; QuickBooks for accounting; and CSV / Excel, custom-website, WordPress, and Magento as generic paths. If you're on something not listed (e.g. a custom in-house system), use the Other System path or the assisted migration.
How long does migration take?
The self-serve CSV path on /settings/import runs inline — expect seconds for a few hundred rows, a minute or two for a few thousand. The Migration Hub runs as a background job with five-second progress polling; a complete multi-entity migration (customers + inventory + repairs + invoices) for a mid-size store typically takes ten to thirty minutes depending on row count and how aggressive the duplicate checks are. Assisted migrations are scheduled with the migration team and turn around in business days, not in real time.
Can I import images alongside inventory?
Not in V1. The CSV templates carry text fields only; inventory images need to be uploaded per-item from the inventory UI after the rows land. We're tracking bulk-image import as a future improvement.
What if I import wrong data — can I undo?
There's no bulk-undo button. If you imported the wrong file or to the wrong tenant, the recovery path is: identify the affected records by their import batch (usually recognisable by the creation timestamp clustered in one window) and either edit or delete in the entity list. For a large mis-import, contact us — we can run a targeted cleanup against the import batch ID if it's recent.
Troubleshooting
CSV upload fails validation
Symptom:upload completes but returns “N rows failed validation” with no rows imported. Cause:a header was renamed, a required field is empty in some rows, or a value doesn't match the expected format (dates, booleans, numeric prices). Fix: re-download the template fresh, copy your data into it column-by-column, keep headers untouched, and re-upload. The validation error lists which rows failed and why; the most common causes are date format (use YYYY-MM-DD) and the is_vip boolean (use true / false).
Migration Hub session stuck on a step
Symptom: the session shows Executing for longer than the progress would suggest, or sits on Mapping with no obvious next action. Cause: executing step: large dataset still processing; mapping step: there's an unmapped required column flagging at the bottom of the page. Fix:for executing — the page polls every five seconds, give it ten minutes before assuming it's stuck; refresh and the status updates. For mapping — scroll to the bottom of the mapping UI; any required source columns missing a target field prevent advance. If the session is genuinely stuck (statusFailed), open it and click Start over or contact us with the session ID.
Not all rows imported
Symptom: source file had 1,000 customer rows, but only 950 show up in Customers. Cause: usually duplicate detection — the Migration Hub deduplicates against existing records (same email or phone), and the CSV importers will skip rows that fail validation rather than halt the whole import. Fix: on a Migration Hub session, the Complete screen shows the breakdown (imported / skipped-as-duplicate / failed). For CSV uploads, the response shows imported and failed counts. If the skipped rows are legitimately new records that look like duplicates, edit the source file to make them distinguishable (different email or phone) and re-import the missing rows only.
Special characters or accents come through garbled
Symptom:customer name “María” imports as “MarÃa” or similar. Cause:the CSV was saved with the wrong character encoding — almost always when Excel exports as “CSV” instead of “CSV UTF-8”. Fix: in Excel, use Save As > CSV UTF-8 (.csv). In Google Sheets, File > Download > CSV is already UTF-8. Re-upload the corrected file.
Excel file rejected
Symptom: .xls (old format) or .numbers file rejected. Cause: the importers accept CSV and .xlsx (modern Excel) only. Fix: re-save as .xlsx or as CSV. For Apple Numbers, export to .xlsx or .csv from the File menu.